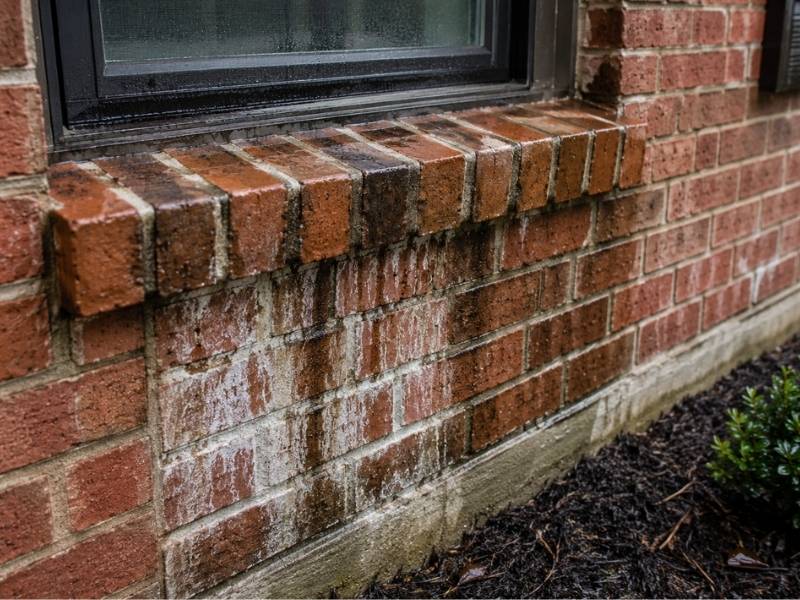
Walk a finished brick wall and the window sills are where the first leaks show up. The sill is the one ledge on the wall that catches water and holds it. Rain runs down the glass, hits the sill and sits there. That’s why so many brick masonry problems start at the sill and spread into the wall below. For developers, the good news is that almost all of it traces back to a few install details you control. Get the sill right and you skip the callbacks.
Why the Sill Is the First Place Water Wins
A window sill is a horizontal shelf. Every other part of a brick wall is vertical, so water runs off it. The sill is the exception. It collects the water that sheets down the window and the wall above.
Most brick sills are built as a rowlock, which is a row of bricks stood on edge and tilted. That look is fine, but it means the sill is a line of separate bricks with mortar joints between each one. Those joints are the weak point. Water works through them, and once it’s under the sill, it’s inside the wall, not outside. The sill also sits right over the wall below, so anything that leaks through drains straight into the part of the wall you most want to keep dry.
The Three Build Mistakes That Cause It
Most sill trouble comes down to three details that get skipped or rushed during the build. None of them are hard. All of them are easy to miss.
The sill has no slope
A sill is supposed to tilt water away from the building. The Brick Industry Association says a brick sill should slope at least 15 degrees down and away, and stick out at least an inch past the face of the wall. A flat or barely tilted sill does the opposite. Water pools on it, sits in the joints and soaks in. That standing water is what starts the damage.
There’s no drip under the front edge
Water is sneaky. When it runs off the front of a sill, it can curl back along the underside and crawl right back to the wall. A drip stops that. On a sloped brick sill the drip is just the lower front corner, set out at least an inch from the wall face. Skip it and the water you thought you shed comes straight back into the brick.
The flashing and end dams are wrong or missing
Behind the sill sits a layer of flashing. Its job is to catch any water that gets through and send it back outside. For it to work, the ends have to turn up at least an inch to form end dams. Those dams stop water from running off the sides of the flashing and into the wall. Miss them and the flashing funnels water into the exact place you’re trying to protect. This one hides. Once the brick is laid, nobody can see whether the end dams are there.
The Window Joint Nobody Re-Checks
There’s a seam between the window frame and the brick. That seam gets filled with sealant, and sealant doesn’t last forever. It dries out, shrinks and cracks on a schedule. Once it splits, water runs behind the sill and into the wall.
A second layer helps here. A pan flashing set under the window catches water that sneaks past the frame or the joint and drains it back out onto the sill. The sealant joint should also stay clear of mortar for the full depth of the brick, so water has a clean path out instead of getting trapped. Builders who add the pan flashing stop a leak that would otherwise show up years later as a stain on the inside wall.
What to Check Before the Brick Closes In
This is the part that saves you money. Every fix above happens before the wall is finished. Once the brick is up, none of it is visible, and none of it is cheap to correct.
- Confirm the sill slopes at least 15 degrees and projects at least an inch past the wall face.
- Check that a drip sits under the front edge, set back at least an inch from the wall.
- Make sure the sill flashing runs past both sides of the window and turns up at least an inch at each end to form end dams.
- Add a pan flashing under the window to catch leaks from the frame or the joint.
- Keep the sealant joint clean, full depth and free of mortar.
Five checks. A few minutes each. They decide whether the wall stays dry for thirty years or leaks in three.
Why This Falls on the Builder
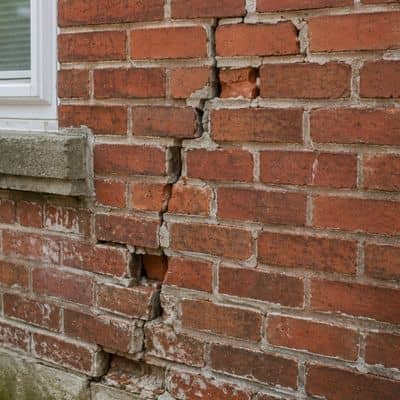
Sill leaks are quiet at first. The wall looks perfect at closing. The flashing and end dams are buried where no inspector and no buyer will ever see them. Two or three years later a damp stain shows up on the inside wall, or the brick under the sill starts to flake, and now it’s a warranty call.
Fixing a bad sill means pulling brick, replacing flashing and rebuilding the detail. That costs real money, and it lands on whoever built it. Doing it right the first time costs minutes at install. The sill is a small piece of the wall, but it’s the one that decides how dry the rest of it stays.
Frequently Asked Questions
Why do window sills leak before the rest of a brick wall?
The sill is the only horizontal surface on the wall, so it catches and holds water instead of shedding it. Most sills are also built from separate bricks with mortar joints that water can work through. That combination makes the sill the first spot to leak.
How much should a brick window sill slope?
A brick sill should slope at least 15 degrees down and away from the building. It should also stick out at least an inch past the wall face so water drips clear. A flat sill holds water and lets it soak into the joints.
What are end dams and why do they matter?
End dams are the upturned ends of the flashing under a sill, bent up at least an inch. They stop water from running off the sides of the flashing and into the wall. Without them, the flashing sends water into the brick instead of out of it.
Can a sill leak even if the brick looks fine?
Yes. The parts that fail, the flashing and end dams, are hidden inside the wall. A sill can look perfect from outside while water runs in behind it. The damage shows up later as an inside stain or flaking brick under the sill.
How often should the sealant around a window be checked?
Sealant has a limited life and cracks as it ages, so check it every few years and after hard weather. Cracked or missing sealant lets water slip behind the sill. Resealing early is cheap next to repairing a wet wall.