Choosing the right material for an outdoor space is an important decision. Many homeowners want something that looks good, lasts for years, and requires little maintenance. That is why brick pavers continue to be one of the most trusted options for walkways, patios, driveways, and entryways.
Brick pavers have been used for generations because they offer both beauty and strength. They fit many home styles, from traditional to modern, and they create outdoor spaces that remain attractive for years. With proper installation and simple care, brick pavers can provide lasting value while improving curb appeal.
Why Brick Pavers Remain a Timeless Choice for Outdoor Spaces
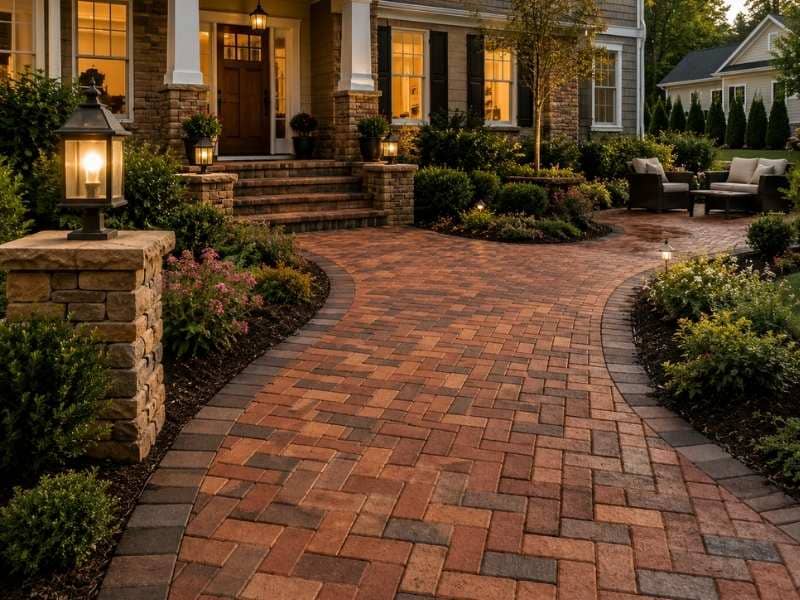
Brick pavers have a classic appearance that never goes out of style. Their natural colors and textured surface help create warm, inviting outdoor spaces that complement many types of homes. Unlike some materials that fade with changing design trends, brick pavers continue to look attractive year after year. They work well for front walkways, garden paths, patios, pool decks, and outdoor gathering areas.
Another advantage is durability. Brick pavers are designed to handle everyday foot traffic and vehicle use without losing their appearance. Because each paver is installed individually, the finished surface has a flexible design that can perform well over time.
Many homeowners also appreciate the wide range of colors, shapes, and sizes available. This makes it easier to create a design that matches the home’s exterior and landscaping.
Brick Paver Patterns That Enhance Curb Appeal
The pattern used during installation can change the look and performance of a paved surface. Some patterns create a formal appearance, while others add movement or visual interest. One of the most popular choices is the herringbone pattern. The interlocking layout creates a strong surface that works well for driveways and walkways with heavy use.
The running bond pattern offers a simple and clean appearance. It is often used for garden paths and entryways because it complements both modern and traditional homes. Basket weave creates a more classic look by placing pairs of pavers at right angles. It works well in smaller patios and decorative outdoor spaces.
Circular patterns can create a striking focal point in large patios or gathering areas. These designs often combine several laying techniques to create a custom appearance. Choosing the right pattern depends on the size of the space, how it will be used, and the overall style of the home.
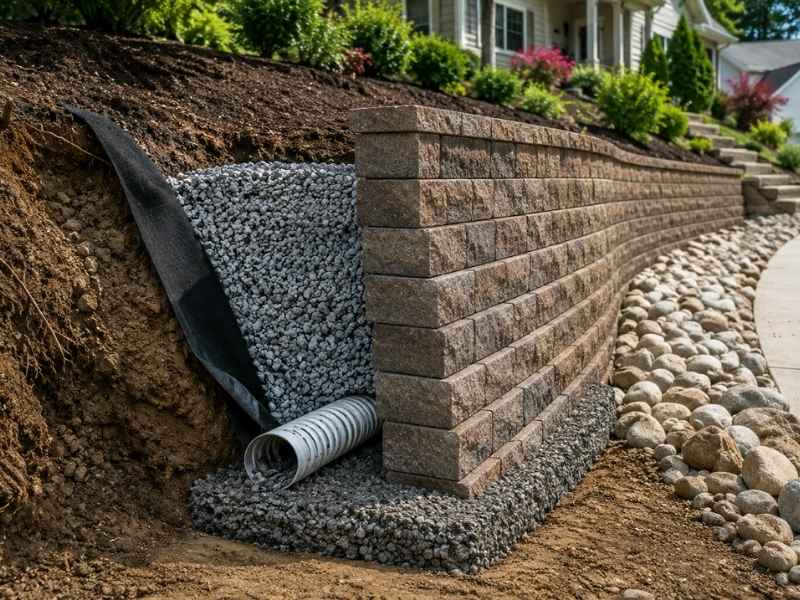
Installation Details That Help Brick Pavers Last for Decades
Even the highest-quality brick pavers depend on proper installation. A strong foundation helps prevent uneven surfaces, shifting, and drainage problems. The process begins by removing soil to the correct depth. This creates room for the layers that support the finished surface.
A compacted base made from crushed stone provides stability. Each layer should be compacted carefully before the next one is added. This helps reduce future settling. Edge restraints are also important. They keep the pavers from spreading apart over time and help maintain clean, straight edges.
Joint sand fills the spaces between the pavers. It helps lock the pavers together while reducing movement during everyday use. When these installation steps are completed correctly, brick pavers can provide many years of reliable performance.
Why Brick Pavers Perform Well in Changing Weather Conditions
Outdoor surfaces experience changing temperatures throughout the year. Heat, rain, and cold weather can all affect how materials perform. Brick pavers handle these changes well because they are made up of individual units rather than one large slab. If the ground expands or settles slightly, the pavers can adjust with it.
This flexibility helps reduce the risk of large cracks that are common with some solid concrete surfaces. If a section becomes uneven because of soil movement or tree roots, individual pavers can often be lifted, the base corrected, and the same pavers reinstalled. This makes repairs easier and helps preserve the original appearance of the paved area.
Their natural surface also provides good traction, making them a practical choice for many outdoor spaces.
Simple Maintenance Practices That Preserve Brick Pavers
Brick pavers require very little maintenance, but regular care helps them stay attractive for many years. Sweeping away leaves, dirt, and debris keeps the surface clean and helps prevent stains. Washing with water and a mild cleaner can remove many common marks without damaging the pavers.
Weeds should be removed before they spread between the joints. If joint sand begins to wear away, fresh sand should be added to help keep the pavers secure. Some homeowners choose to apply a sealer. While sealing is not always necessary, it can help reduce stains, improve color, and make routine cleaning easier.
It is also a good idea to inspect the paved surface from time to time. Small problems such as loose pavers or low spots are often simple to correct before they become larger repairs.
Frequently Asked Questions
How long do brick pavers typically last?
With proper installation and routine maintenance, brick pavers can last for several decades. Their lifespan depends on the quality of the materials, the base preparation, and how the paved area is used.
Are brick pavers better than poured concrete?
Both materials have benefits, but brick pavers offer greater flexibility. Individual pavers can often be repaired or replaced without removing the entire surface.
Do brick pavers require sealing?
No. Sealing is optional. Some homeowners choose to seal brick pavers to improve stain resistance and enhance their color, but many paver installations perform well without it.
Can damaged brick pavers be replaced individually?
Yes. One of the biggest advantages of brick pavers is that damaged units can usually be removed and replaced without disturbing the surrounding area.
What is the best pattern for a brick paver walkway?
The best pattern depends on the design of the property and how the walkway will be used. Herringbone is popular for strength, while running bonds offer a clean and simple appearance.