
↓
 

Madison Brick & Stone

Brick & Stone Masons in Madison, AL

Madison Brick & Stone
  • Home
  • Brick Masonry
  • Stone Masonry
  • Indoor Fireplaces
  • Outdoor Fireplace
Home→Tags brick masonry - Page 2 << 1 2 3 4 5 >>

Tag Archives: brick masonry

Post navigation

← Older posts
Newer posts →

Brick Masonry Problems That Start Around Window Sills

Madison Brick & Stone Posted on June 24, 2026 by madisonBSJune 24, 2026
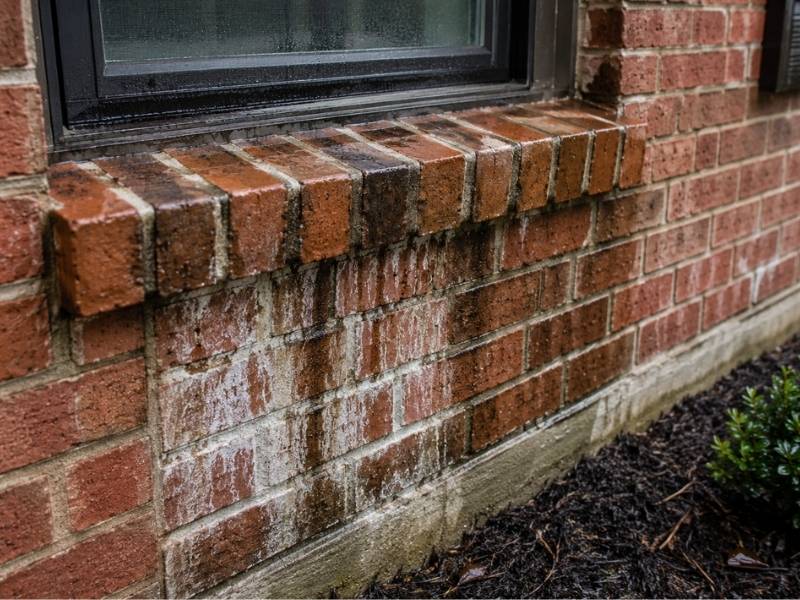
Brick window sill showing moisture staining and water damage caused by poor drainage and improper flashing details

Walk a finished brick wall and the window sills are where the first leaks show up. The sill is the one ledge on the wall that catches water and holds it. Rain runs down the glass, hits the sill and sits there. That’s why so many brick masonry problems start at the sill and spread into the wall below. For developers, the good news is that almost all of it traces back to a few install details you control. Get the sill right and you skip the callbacks.

Why the Sill Is the First Place Water Wins

A window sill is a horizontal shelf. Every other part of a brick wall is vertical, so water runs off it. The sill is the exception. It collects the water that sheets down the window and the wall above.

Most brick sills are built as a rowlock, which is a row of bricks stood on edge and tilted. That look is fine, but it means the sill is a line of separate bricks with mortar joints between each one. Those joints are the weak point. Water works through them, and once it’s under the sill, it’s inside the wall, not outside. The sill also sits right over the wall below, so anything that leaks through drains straight into the part of the wall you most want to keep dry.

The Three Build Mistakes That Cause It

Most sill trouble comes down to three details that get skipped or rushed during the build. None of them are hard. All of them are easy to miss.

The sill has no slope

A sill is supposed to tilt water away from the building. The Brick Industry Association says a brick sill should slope at least 15 degrees down and away, and stick out at least an inch past the face of the wall. A flat or barely tilted sill does the opposite. Water pools on it, sits in the joints and soaks in. That standing water is what starts the damage.

There’s no drip under the front edge

Water is sneaky. When it runs off the front of a sill, it can curl back along the underside and crawl right back to the wall. A drip stops that. On a sloped brick sill the drip is just the lower front corner, set out at least an inch from the wall face. Skip it and the water you thought you shed comes straight back into the brick.

The flashing and end dams are wrong or missing

Behind the sill sits a layer of flashing. Its job is to catch any water that gets through and send it back outside. For it to work, the ends have to turn up at least an inch to form end dams. Those dams stop water from running off the sides of the flashing and into the wall. Miss them and the flashing funnels water into the exact place you’re trying to protect. This one hides. Once the brick is laid, nobody can see whether the end dams are there.

The Window Joint Nobody Re-Checks

There’s a seam between the window frame and the brick. That seam gets filled with sealant, and sealant doesn’t last forever. It dries out, shrinks and cracks on a schedule. Once it splits, water runs behind the sill and into the wall.

A second layer helps here. A pan flashing set under the window catches water that sneaks past the frame or the joint and drains it back out onto the sill. The sealant joint should also stay clear of mortar for the full depth of the brick, so water has a clean path out instead of getting trapped. Builders who add the pan flashing stop a leak that would otherwise show up years later as a stain on the inside wall.

What to Check Before the Brick Closes In

This is the part that saves you money. Every fix above happens before the wall is finished. Once the brick is up, none of it is visible, and none of it is cheap to correct.

  • Confirm the sill slopes at least 15 degrees and projects at least an inch past the wall face.
  • Check that a drip sits under the front edge, set back at least an inch from the wall.
  • Make sure the sill flashing runs past both sides of the window and turns up at least an inch at each end to form end dams.
  • Add a pan flashing under the window to catch leaks from the frame or the joint.
  • Keep the sealant joint clean, full depth and free of mortar.

Five checks. A few minutes each. They decide whether the wall stays dry for thirty years or leaks in three.

Why This Falls on the Builder

Sill leaks are quiet at first. The wall looks perfect at closing. The flashing and end dams are buried where no inspector and no buyer will ever see them. Two or three years later a damp stain shows up on the inside wall, or the brick under the sill starts to flake, and now it’s a warranty call.

Fixing a bad sill means pulling brick, replacing flashing and rebuilding the detail. That costs real money, and it lands on whoever built it. Doing it right the first time costs minutes at install. The sill is a small piece of the wall, but it’s the one that decides how dry the rest of it stays.

Frequently Asked Questions

Why do window sills leak before the rest of a brick wall?

The sill is the only horizontal surface on the wall, so it catches and holds water instead of shedding it. Most sills are also built from separate bricks with mortar joints that water can work through. That combination makes the sill the first spot to leak.

How much should a brick window sill slope?

A brick sill should slope at least 15 degrees down and away from the building. It should also stick out at least an inch past the wall face so water drips clear. A flat sill holds water and lets it soak into the joints.

What are end dams and why do they matter?

End dams are the upturned ends of the flashing under a sill, bent up at least an inch. They stop water from running off the sides of the flashing and into the wall. Without them, the flashing sends water into the brick instead of out of it.

Can a sill leak even if the brick looks fine?

Yes. The parts that fail, the flashing and end dams, are hidden inside the wall. A sill can look perfect from outside while water runs in behind it. The damage shows up later as an inside stain or flaking brick under the sill.

How often should the sealant around a window be checked?

Sealant has a limited life and cracks as it ages, so check it every few years and after hard weather. Cracked or missing sealant lets water slip behind the sill. Resealing early is cheap next to repairing a wet wall.
Posted in Brick Mason | Tagged brick mason, brick masonry, brick masonry problems, masonry contractor

Why Weep Holes Matter More Than Most Homeowners Realize

Madison Brick & Stone Posted on June 19, 2026 by madisonBSJune 16, 2026
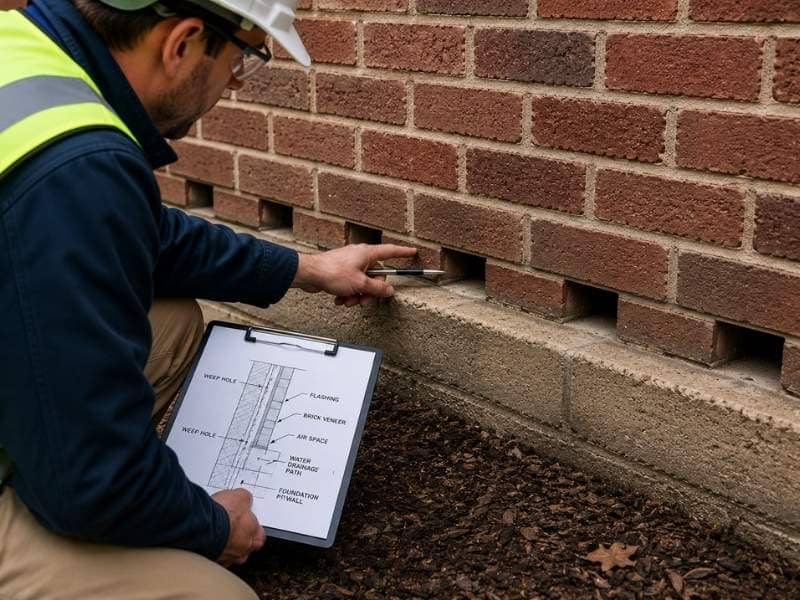
Engineer checking weep holes at the base of a brick wall to ensure proper water drainage.

Brick walls look solid. That’s the whole point. But weep holes tell a different story. These small openings, spaced along the bottom row of bricks, do something the wall can’t do on its own. They let water out. And if you’ve never noticed them before, you’re not alone. Most homeowners walk past them every day without a second thought.

That’s worth changing.

What Are Weep Holes and What Do They Do?

Brick walls are not waterproof. Rain pushes through small gaps in the mortar. Water vapor from inside the house moves through the wall and collects in the air space behind the brick. That gap exists by design. It gives the wall room to breathe. But when moisture builds up in that space with no way out, problems follow.

Weep holes sit at the base of the brick layer, right above the flashing. Gravity does the rest. Water drains down, reaches the opening, and exits the wall. The system is simple, but it only works when those openings stay clear.

According to the Brick Industry Association, weep holes should be spaced no more than 33 inches apart along the base course to provide adequate drainage across the full wall.

How Trapped Moisture Damages Brick Walls

When moisture has no way to exit the wall cavity, it soaks into mortar joints, expands during freezing temperatures, and creates conditions where mold can grow. Each of these problems gets worse over time and costs more to fix the longer it goes unaddressed.

Here’s what that leads to:

  • Mortar breakdown. Water soaks into joints and softens the bond between bricks. A hairline gap turns into a crumbling joint. That crumbling joint lets in more water, which widens the damage further.
  • Brick cracking and spalling. Trapped moisture freezes in cold weather. Ice expands. That expansion pushes outward against the face of the brick until it cracks or breaks off in pieces. The Portland Cement Association notes that freeze-thaw damage accounts for more than 25% of masonry repair calls in cold climates.
  • Mold inside the wall. A wet wall cavity is exactly where mold grows. The EPA reports that mold can begin developing on wet building materials within 24 to 48 hours. By the time it becomes visible or noticeable, it has usually already spread across the framing behind the brick.

None of these problems announce themselves early. That’s what makes proper drainage so important.

What Blocked or Missing Weep Holes Look Like From the Outside

The most visible signs of drainage failure in brick masonry are white staining on the brick surface, soft or sandy mortar at the base of the wall, cracks along mortar joints near corners or windows, and damp interior walls after rain.

You don’t need to open up a wall to know something is wrong. Most drainage problems leave marks on the surface.

White staining is usually the first sign. That chalky residue, called efflorescence, forms when water moves through the masonry and carries dissolved salts to the surface. It wipes off, but it keeps coming back until the underlying drainage problem gets fixed.

Soft mortar at the base is another signal. Run a finger along the mortar joint. If it feels sandy or crumbles under light pressure, water has been sitting there long enough to break it down.

Cracks near corners and window frames tend to show up where water concentrates. Brick faces that start to chip or flake at the edges are showing early freeze-thaw damage.

Inside the house, moisture stains on drywall near exterior walls, or a damp feeling along the base of an exterior room after heavy rain, can trace back to a drainage issue outside.

One sign on its own doesn’t always point to weep holes. Two or more together usually do.

How to Keep Weep Holes Clear

Inspect weep holes twice a year and after major storms. Clear debris with a thin wire or small brush. Keep mulch and soil below the openings. Check the flashing condition above windows and doors. Use mesh inserts to block pests without sealing the drainage path.

Here’s what that inspection looks like in practice:

  • Find the openings. Weep holes sit along the first or second row of bricks above grade. They also appear above windows and doors. They look like short gaps where mortar was left out between bricks.
  • Clear any blockage. A thin wire or a small brush is enough. The goal is to open the passage so water can move through freely. Don’t force anything deep into the wall.
  • Check the area around the base. Mulch, soil, and landscaping materials piled against the wall can cover weep holes entirely. Keep the base of the wall clear, with at least a few inches of separation between the soil line and the openings.
  • Look at the flashing. Weep holes work as part of a system. If the flashing above windows or at the base of the wall is damaged, water doesn’t reach the openings the way it should. Damaged flashing needs repair, not just a cleared weep hole.
  • Use mesh inserts if needed. Insects sometimes nest inside weep holes. Mesh inserts solve that problem without blocking drainage. Never seal the openings with caulk or mortar.

Frequently Asked Questions

What is the difference between a weep hole and a vent in brick masonry?

Weep holes and vents both appear in the brick base course, but they serve different purposes. Weep holes drain liquid water out of the wall cavity. Vents allow air to circulate through the cavity and help the wall dry faster after rain or condensation. Some installations include both. Others rely on weep holes alone to handle both functions.

Do newer homes have weep holes?

Most homes built after modern masonry standards became common include weep holes, but not all. Some older construction omitted them entirely. Others had them sealed during remodels by contractors unfamiliar with their purpose. The only way to know for certain is to inspect the base course of the brick wall.

Can insects get into the house through weep holes?

Weep holes are small, but some insects can enter through them. Mesh inserts designed for brick masonry are the standard solution. They allow water and air to move freely while blocking most pests. They’re available at most hardware stores and easy to install without professional help.

Is efflorescence a sign of a serious problem?

Efflorescence by itself is not structural damage. It’s a mineral deposit left behind as water evaporates from the surface. But it does indicate that water is moving through the masonry in a way it shouldn’t. Recurring efflorescence, especially along the base of a wall, usually points to a drainage issue that benefits from a closer look.

Posted in Brick Mason | Tagged brick masonry

How Long Does Brick Masonry Last With Proper Maintenance?

Madison Brick & Stone Posted on June 18, 2026 by madisonBSJune 16, 2026
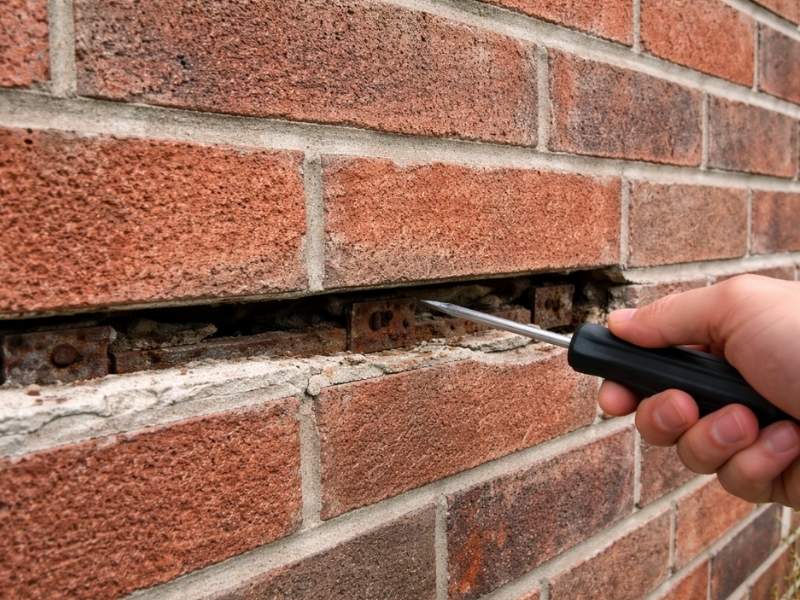
Close-up of deteriorating mortar joints in a brick masonry wall being inspected for damage and maintenance needs.

Brick masonry is one of the longest-lasting building materials available. Most people know that. What they don’t know is how much the lifespan varies depending on brick masonry maintenance. A well-kept brick wall can last 100 years or more. A neglected one can start failing in 20. This article explains what drives that difference and what owners need to do to get the most out of their brick masonry. 

What Brick Masonry Is Actually Made Of

Brick masonry is a system, not just brick. It includes the bricks themselves, the mortar joints between them, any flashing or waterproofing details and the structural support behind the wall.

Brick is extremely durable. A fired clay brick can last centuries when kept dry and structurally sound. The mortar is the weaker part of the system. It’s designed to be softer than the brick so it absorbs stress and movement. That protects the brick, but it also means the mortar wears out first.

Understanding this helps owners focus maintenance in the right place. The brick rarely fails. The mortar does.

How Long Brick Masonry Lasts in Different Situations

The lifespan of brick masonry depends on the application, the climate and how well it’s maintained.

Exterior brick walls on residential buildings typically last 100 years or more with proper care. Many historic brick buildings across the United States are still structurally sound after 150 years. The brick itself is rarely the issue. Water infiltration and neglected mortar are the main causes of early failure.

Brick chimneys have a shorter functional lifespan than walls because they’re exposed to weather on all sides and to high heat from inside. A well-maintained chimney can last 50 to 100 years. One that never gets inspected or repointed can start failing structurally in 20 to 30 years.

Retaining walls and garden walls made of brick face more stress than vertical building walls. They hold back soil and water. Without proper drainage and maintenance, they can fail in 30 to 40 years. With good drainage and regular repointing, they can last much longer.

Interior brick, such as exposed brick inside a building, lasts almost indefinitely when kept dry and free from structural stress.

The Maintenance That Extends Brick Lifespan

Most of the maintenance that extends brick lifespan comes down to two things: keeping water out and keeping the mortar in good condition.

Repointing is the single most important maintenance task. Mortar joints typically need to be replaced every 25 to 30 years under normal conditions. In wet climates or on surfaces that get direct weather exposure, that interval can be shorter. Repointing removes deteriorated mortar and replaces it with fresh mortar. It stops water from getting into the wall and protects the brick from freeze-thaw damage.

Sealing is useful in some situations. A breathable masonry sealer applied to exterior brick slows water absorption without trapping moisture inside the wall. Trapped moisture is worse than surface moisture because it has nowhere to go and causes damage from the inside out. Not every brick surface needs sealing, but exposed walls in wet climates benefit from it.

Cleaning brick correctly also matters. Pressure washing at high pressure damages mortar and can drive water deep into the wall. Gentle cleaning with appropriate masonry cleaners keeps the surface in good condition without causing damage.

Controlling water at the base of the wall is often overlooked. Soil that slopes toward the wall, sprinklers that hit the brick and planters placed against the wall all push moisture into the masonry from the bottom. Over years, that moisture wicks up through the wall and causes deterioration.

Signs That Brick Masonry Needs Attention

Catching problems early keeps repair costs low. Several signs indicate that brick masonry needs work before the damage gets serious.

Crumbling or missing mortar is the most obvious sign. If you can scrape mortar out of the joints with a key or a fingernail, it’s time to repoint. Soft mortar offers no protection against water.

Efflorescence is the white powder that appears on brick surfaces. It’s caused by water moving through the wall and leaving mineral deposits on the surface. It’s not a structural problem on its own, but it means water is getting into the wall somewhere. The source needs to be found and addressed.

Spalling brick has a surface that’s breaking away in flakes or chunks. This happens when water gets inside the brick, freezes and pushes the face off. Spalled brick can’t be repaired. The damaged bricks need to be replaced.

Stair-step cracks in mortar joints are often a sign of foundation movement or settlement. These are different from normal heat or shrinkage cracks. They need to be assessed by a professional to understand the cause before any repair is done.

What Happens Without Maintenance

Brick masonry that doesn’t get maintained fails faster than most owners expect. Deteriorated mortar lets water in. Water causes freeze-thaw damage. Freeze-thaw damage widens cracks and loosens bricks. Loose bricks let in more water. The cycle accelerates.

A wall that needed repointing 10 years ago but didn’t get it may now need partial rebuilding. That costs significantly more than repointing would have. In some cases, full sections of a wall have to be torn down and rebuilt because the damage went too far.

Neglected chimneys are a fire hazard on top of being a structural problem. A deteriorated flue liner or cracked chimney crown can allow heat, sparks and combustion gases to reach the surrounding structure.

Numbers Worth Knowing

Fired clay brick can last 500 years or more when kept dry and structurally supported. Examples of brick structures from the 1600s and 1700s are still standing across the United States and Europe.

Mortar joints typically need repointing every 25 to 30 years under normal conditions.

The freeze-thaw cycle is the leading cause of masonry deterioration in cold climates. Water expands by about 9 percent when it freezes, which is enough to crack mortar and spall brick over repeated cycles.

The Brick Industry Association notes that properly maintained brick veneer walls can last the life of the building, often defined as 100 years or more.

Repointing costs significantly less than rebuilding. Early intervention on deteriorated mortar is always the more cost-effective choice.

Frequently Asked Questions

How long does brick masonry last with proper maintenance?

Brick masonry can last 100 years or more with proper maintenance. The brick itself is extremely durable and rarely the point of failure. Mortar joints need to be repointed every 25 to 30 years. Water infiltration and neglected mortar are the main causes of early failure.

How often does brick masonry need to be repointed?

Mortar joints typically need repointing every 25 to 30 years under normal conditions. In wet climates or on surfaces with heavy weather exposure, the interval may be shorter. Soft, crumbling or missing mortar is a sign that repointing is overdue.

What causes brick masonry to fail early?

The most common causes of early failure are water infiltration, neglected mortar joints and freeze-thaw damage. Poor original construction, incorrect mortar mix and inadequate drainage also shorten the lifespan. Maintenance that starts late costs more and addresses more damage than routine upkeep would have.

Can damaged brick be repaired or does it need to be replaced?

Deteriorated mortar can be repaired by repointing. Spalled or cracked bricks cannot be repaired and need to be replaced. Matching replacement brick to existing brick can be difficult on older buildings. A masonry contractor can assess what can be repaired and what needs replacement.

Does brick masonry need to be sealed?

Not always. A breathable masonry sealer can slow water absorption on exposed walls in wet climates. However, the wrong type of sealer traps moisture inside the wall and causes more damage than it prevents. Any sealer used on brick should be vapor-permeable. Consult a masonry professional before sealing.

Posted in Brick | Tagged brick mason, brick masonry, brick masonry problems

Post navigation

← Older posts
Newer posts →

© Copyright Madison Brick & Stone
Madison, Alabama ​35758
Phone: (256) 270-2702

Privacy Policy | Terms of Use

Web Development and SEO by: AuburnBusiness.com

The owner of this website, AuburnBusiness, LLC, provides marketing for local skilled labor businesses in the Huntsville and Madison, AL area.

↑