↓
 

Madison Brick & Stone

Brick & Stone Masons in Madison, AL

Madison Brick & Stone
  • Home
  • Brick Masonry
  • Stone Masonry
  • Indoor Fireplaces
  • Outdoor Fireplace
Home→Tags brick mason 1 2 3 >>

Tag Archives: brick mason

Post navigation

← Older posts

What Causes Brick Hearths to Deteriorate Faster in Older Homes

Madison Brick & Stone Posted on July 10, 2026 by madisonBSJuly 2, 2026
Homeowner inspecting an aging brick hearth with crumbling mortar and worn bricks in an older home in Madison, Alabama.

A brick hearth in a 70-year-old home breaks down for different reasons than a new one. Old hearths carry years of wear. They were also built with older methods. That mix often causes faster damage than most people expect.

This matters if you renovate or check older homes. A hearth can look nice and still hide years of hidden stress. Here is what really causes faster damage in old brick hearths. And what to check before you fix it fast.

How Aging Mortar Loss Reduces Brick Hearth Structural Stability

Mortar wears out. Old hearths are often past their prime. Many old homes used lime mortar. It is softer than the cement mix used today. It was not made to last 100 years without care.

As mortar ages, it loses strength slowly. Joints that once held brick tight start to crumble. Watch for these signs:

  • Mortar that flakes off when you scrape it lightly
  • Joints that sit lower than the brick around them
  • Bricks that move a little when you press them, even with no visible crack

This damage builds up over many years. A hearth can look fine for 40 years. Then it can start to fail within a few more.

Why Repeated Heat Exposure Accelerates Brick Surface Breakdown

Every fire adds a little stress to brick and mortar. An old hearth has felt this stress for a long time.

The Buildup Effect

A hearth used for decades has gone through thousands of heat cycles. Each cycle causes tiny changes in size. One cycle does nothing. Years of cycles wear down the bond between brick and mortar. You often don’t see this damage until it’s far along.

Why Old Brick Reacts Differently

Old brick was often made at different heat levels than brick made today. It can be more porous. That means it soaks up more heat and moisture. Over time, this makes old brick wear out faster than newer, denser brick under the same use.

How Foundation Movement in Older Homes Affects Hearth Alignment

Old homes have had more time to settle. That settling is often uneven. A hearth built decades ago can slowly shift out of line with the rest of the house.

Watch for these signs:

  • One edge of the hearth sits higher or lower than the floor around it
  • New gaps show up between the hearth and nearby flooring or trim
  • Cracks form in a steady diagonal line, not random spots

Foundation movement in old homes often happens slowly over many years. A hearth that stayed level for decades can still shift if the foundation below it keeps settling.

The Role of Moisture Infiltration in Hidden Brick Hearth Decay

Many old homes lack the water barriers used in new construction. That gap gives water more ways to reach the brick and mortar.

Once water gets in, it causes real harm. It can:

  • Break down mortar from the inside, faster than normal weather wear
  • Rust any metal ties used in the original build
  • Lead to freeze thaw damage in colder climates, where trapped moisture expands and pushes masonry apart

Old homes with older plumbing or worn roof flashing near the chimney face this risk more often. You often can’t see the damage until it shows up on the hearth or nearby wall. By then, the internal deterioration has already been building for a long time.

Why Outdated Construction Methods Lead to Faster Hearth Deterioration

Building rules have changed a lot over time. Many old hearths use methods that modern codes replaced for good reason.

Here’s how old and new methods often differ:

FactorOlder ConstructionModern Standard
Mortar typeOften lime-based, softerCement blends, more durable
Room to expandOften missingBuilt in to handle heat movement
Water barriersOften thin or missingStandard practice
Base supportVaries, sometimes weakBuilt to hold hearth weight

These older methods were not wrong for their time. They just were not built to last as long as today’s methods. That’s a big reason old hearths tend to wear out faster than their age alone would suggest.

Frequently Asked Questions

How do I know if an old hearth’s mortar needs replacing?

If mortar flakes off easily, sits lower than the surrounding brick, or allows brick to shift under light pressure, it has likely lost strength and needs replacement.

Does an older home’s foundation affect hearth stability?

Yes. Ongoing or past foundation settling can gradually shift a hearth out of alignment. This often appears as uneven height, new gaps, or diagonal cracking even if the hearth was originally level.

Is older brick more prone to heat damage than modern brick?

Often, yes. Older brick was produced using different clay compositions and firing methods which can make it more porous and more susceptible to heat and moisture wear over time.

Can moisture damage a hearth without visible water stains?

Yes. Water can enter through gaps in flashing or missing barriers and cause internal damage long before any surface staining becomes visible.

Should older hearths be updated to modern building standards?

In many cases, yes, especially if the original construction lacks expansion allowance, proper water barriers, or adequate base support. Updating these elements during repair can help prevent recurring damage.
Posted in Brick Mason | Tagged brick mason, brick masonry, brick masonry problems

Brick Masonry Repairs Sellers Should Handle Before Listing a Home

Madison Brick & Stone Posted on June 25, 2026 by madisonBSJune 24, 2026
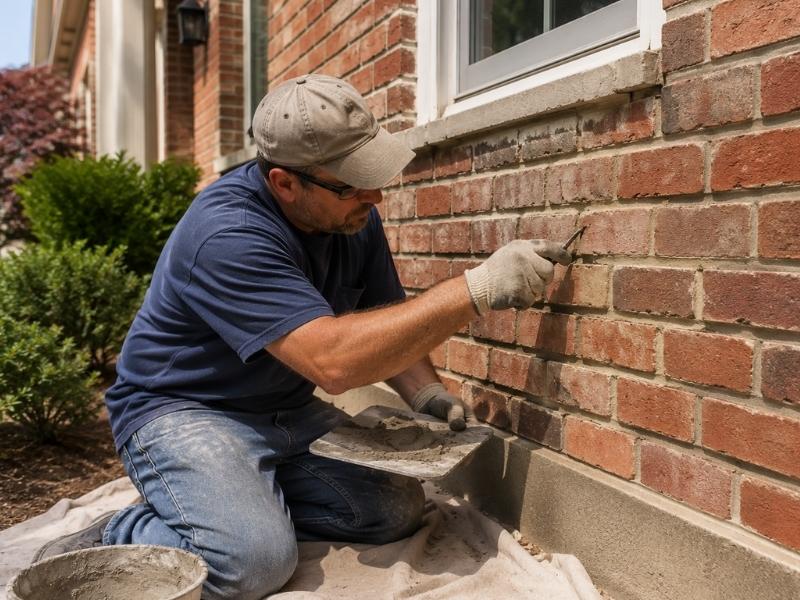
Mason repointing deteriorated brick mortar joints on a residential home before listing the property for sale

A home inspector walking a property in Madison will look at the brick the same way a buyer does: carefully and with fresh eyes. Cracked mortar, spalling brick and leaning sections don’t just look bad in listing photos. They show up in inspection reports, trigger buyer negotiations and sometimes kill deals. Brick masonry problems that seem minor to a seller who’s lived with them for years can become major bargaining chips for a buyer looking for any reason to lower an offer. Fixing the right issues before listing protects the sale price and keeps the transaction on track.

Why Brick Condition Affects More Than Curb Appeal

Brick homes have a reputation for being solid and low-maintenance. That reputation works in a seller’s favor, but only if the brick actually looks the part.

A buyer who sees cracked mortar and stained brick doesn’t think low maintenance. They think deferred maintenance. They start wondering what else has been ignored. That shift in perception affects more than the price they offer. It affects how seriously they take every other item on the inspection report.

In Madison, where brick construction is common across established neighborhoods, buyers have options. A home with visible masonry problems competing against a similar home with clean brick is at a disadvantage before the first showing ends.

Deteriorating Mortar Joints

This is the most common masonry issue found on homes listed for sale, and the most overlooked.

Mortar joints don’t last forever. On older homes, they’ve often reached the end of their life. Mortar that’s cracked, recessed or crumbling no longer seals the gaps between bricks. Water gets in. In Madison’s climate, that leads to staining, interior moisture problems and faster brick damage.

A home inspector will note deteriorated mortar. A buyer’s agent will use it in negotiations. Repointing the affected joints before listing removes that talking point.

The repair involves grinding out old mortar to a consistent depth and packing in new mortar that matches the original in color and type. This costs far less than the leverage a buyer gains when an inspection report flags the problem.

One caution: don’t use a mortar that’s harder than the original brick. Harder mortar causes brick faces to chip over time. A mason who has worked on older homes will know the right mix.

Cracks in the Brick or Mortar

Not all cracks are the same. Sellers should understand the difference before deciding what to fix.

Hairline cracks in mortar joints are usually cosmetic. Repointing handles them without concern. Stair-step cracks that run diagonally through the mortar joints are a different matter. These can signal foundation movement or settling. An inspector will flag them. A structural engineer may be called in.

Horizontal cracks, especially on a basement wall, are the most serious type. They can signal lateral pressure on the wall. These need professional evaluation before listing, not a patch job that hides the problem.

For cosmetic cracks, repair before listing. For cracks that may be structural, get an evaluation and follow the engineer’s recommendation. Listing a home with known structural cracking and hoping no one notices is a losing strategy.

Spalling Brick Faces

Spalling happens when the face of a brick flakes or pops off. Water soaks into the brick, freezes and expands, breaking off the surface layer.

Spalled bricks are both a visual and a functional problem. Once the face is gone, the brick absorbs water faster and the damage spreads. On a listing, spalled brick looks like neglect even when the rest of the home is clean and well-kept.

Individual spalled bricks can be replaced. A mason removes the damaged unit, sets a matching replacement and repoints the surrounding joints. Getting a good color match on older brick is the difficult part. A skilled mason will look for salvaged brick or use weathering methods to reduce the visual gap.

Wide-spread spalling across a large section of wall is a larger project and a more serious conversation about the home’s overall condition.

Chimney Masonry Problems

Chimneys take more weather damage than any other part of a brick home. They sit exposed at the top of the roof with no overhangs to protect them.

Common problems include cracked mortar joints, spalling bricks, a damaged crown and failed flashing at the roofline. A home inspector will examine the chimney closely, often using binoculars or a camera. Anything found there goes in the report.

Repointing the chimney’s mortar joints is a manageable repair. Replacing a cracked crown keeps water from running down into the chimney structure. These repairs cost a reasonable amount upfront and prevent larger price conversations during buyer negotiations.

Efflorescence and Surface Staining

White chalky deposits on brick are called efflorescence. Water carries salts through the masonry and leaves them on the surface as it dries. It’s not a structural problem, but it looks like one in listing photos and raises questions about moisture.

Efflorescence can be cleaned with a diluted acid wash or a masonry-specific cleaner. Cleaning before listing photos are taken costs little and removes a distraction that buyers notice right away.

Dark staining from algae, mildew or water marks can also be cleaned before listing. Clean brick photographs better and creates a stronger first impression than brick with years of surface buildup.

Frequently Asked Questions

What brick masonry repairs matter most before listing a home?

Mortar joint deterioration, cracked or spalled bricks, and chimney masonry problems show up most often in inspection reports. Fixing these before listing removes negotiating leverage from buyers and helps protect the asking price.

How much does repointing brick mortar cost before a home sale?

Cost varies based on the area affected and the home’s size. A typical repair for moderate joint deterioration can range from several hundred to a few thousand dollars. That is often less than the price reduction a buyer may negotiate when an inspection report identifies masonry issues.

Can cracked brick mortar be left until after the sale?

Leaving visible mortar cracks shifts the repair cost to the buyer, but it also shifts negotiating power to the buyer. Sellers who address obvious masonry issues before listing often achieve better outcomes because buyers frequently use inspection findings to negotiate lower prices.

What is efflorescence and should it be cleaned before listing?

Efflorescence is a white mineral deposit left on brick surfaces when moisture evaporates through the masonry. While it is usually not a structural concern, it can make a home appear to have moisture problems. Cleaning it before listing is a simple way to improve curb appeal and presentation.

When should a seller involve a structural engineer in brick masonry issues?

Stair-step cracks running diagonally through mortar joints or horizontal cracks along basement walls should be evaluated by a structural engineer before listing. These patterns may indicate foundation movement or excessive wall pressure. Addressing only the visible damage without resolving the cause can create disclosure concerns and potential liability.

Posted in Brick Mason | Tagged brick mason, brick masonry, brick masonry problems

Brick Masonry Problems That Start Around Window Sills

Madison Brick & Stone Posted on June 24, 2026 by madisonBSJune 24, 2026
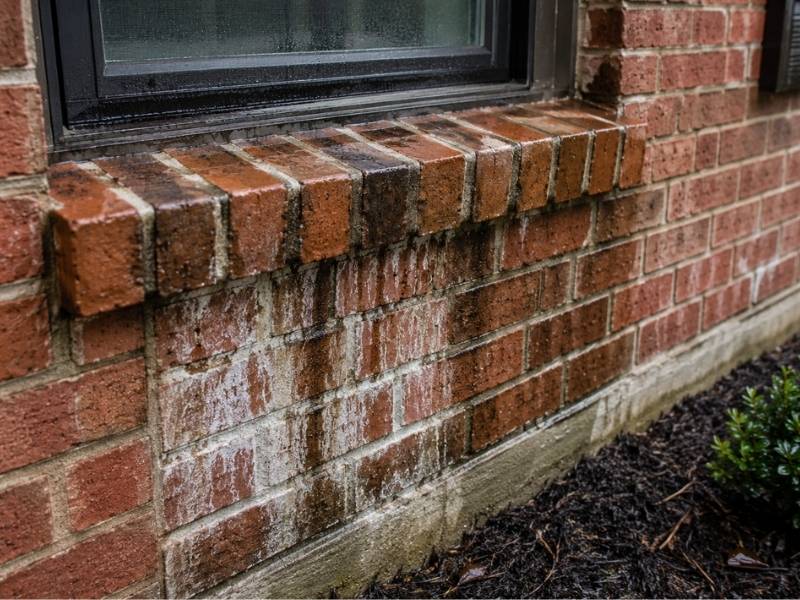
Brick window sill showing moisture staining and water damage caused by poor drainage and improper flashing details

Walk a finished brick wall and the window sills are where the first leaks show up. The sill is the one ledge on the wall that catches water and holds it. Rain runs down the glass, hits the sill and sits there. That’s why so many brick masonry problems start at the sill and spread into the wall below. For developers, the good news is that almost all of it traces back to a few install details you control. Get the sill right and you skip the callbacks.

Why the Sill Is the First Place Water Wins

A window sill is a horizontal shelf. Every other part of a brick wall is vertical, so water runs off it. The sill is the exception. It collects the water that sheets down the window and the wall above.

Most brick sills are built as a rowlock, which is a row of bricks stood on edge and tilted. That look is fine, but it means the sill is a line of separate bricks with mortar joints between each one. Those joints are the weak point. Water works through them, and once it’s under the sill, it’s inside the wall, not outside. The sill also sits right over the wall below, so anything that leaks through drains straight into the part of the wall you most want to keep dry.

The Three Build Mistakes That Cause It

Most sill trouble comes down to three details that get skipped or rushed during the build. None of them are hard. All of them are easy to miss.

The sill has no slope

A sill is supposed to tilt water away from the building. The Brick Industry Association says a brick sill should slope at least 15 degrees down and away, and stick out at least an inch past the face of the wall. A flat or barely tilted sill does the opposite. Water pools on it, sits in the joints and soaks in. That standing water is what starts the damage.

There’s no drip under the front edge

Water is sneaky. When it runs off the front of a sill, it can curl back along the underside and crawl right back to the wall. A drip stops that. On a sloped brick sill the drip is just the lower front corner, set out at least an inch from the wall face. Skip it and the water you thought you shed comes straight back into the brick.

The flashing and end dams are wrong or missing

Behind the sill sits a layer of flashing. Its job is to catch any water that gets through and send it back outside. For it to work, the ends have to turn up at least an inch to form end dams. Those dams stop water from running off the sides of the flashing and into the wall. Miss them and the flashing funnels water into the exact place you’re trying to protect. This one hides. Once the brick is laid, nobody can see whether the end dams are there.

The Window Joint Nobody Re-Checks

There’s a seam between the window frame and the brick. That seam gets filled with sealant, and sealant doesn’t last forever. It dries out, shrinks and cracks on a schedule. Once it splits, water runs behind the sill and into the wall.

A second layer helps here. A pan flashing set under the window catches water that sneaks past the frame or the joint and drains it back out onto the sill. The sealant joint should also stay clear of mortar for the full depth of the brick, so water has a clean path out instead of getting trapped. Builders who add the pan flashing stop a leak that would otherwise show up years later as a stain on the inside wall.

What to Check Before the Brick Closes In

This is the part that saves you money. Every fix above happens before the wall is finished. Once the brick is up, none of it is visible, and none of it is cheap to correct.

  • Confirm the sill slopes at least 15 degrees and projects at least an inch past the wall face.
  • Check that a drip sits under the front edge, set back at least an inch from the wall.
  • Make sure the sill flashing runs past both sides of the window and turns up at least an inch at each end to form end dams.
  • Add a pan flashing under the window to catch leaks from the frame or the joint.
  • Keep the sealant joint clean, full depth and free of mortar.

Five checks. A few minutes each. They decide whether the wall stays dry for thirty years or leaks in three.

Why This Falls on the Builder

Sill leaks are quiet at first. The wall looks perfect at closing. The flashing and end dams are buried where no inspector and no buyer will ever see them. Two or three years later a damp stain shows up on the inside wall, or the brick under the sill starts to flake, and now it’s a warranty call.

Fixing a bad sill means pulling brick, replacing flashing and rebuilding the detail. That costs real money, and it lands on whoever built it. Doing it right the first time costs minutes at install. The sill is a small piece of the wall, but it’s the one that decides how dry the rest of it stays.

Frequently Asked Questions

Why do window sills leak before the rest of a brick wall?

The sill is the only horizontal surface on the wall, so it catches and holds water instead of shedding it. Most sills are also built from separate bricks with mortar joints that water can work through. That combination makes the sill the first spot to leak.

How much should a brick window sill slope?

A brick sill should slope at least 15 degrees down and away from the building. It should also stick out at least an inch past the wall face so water drips clear. A flat sill holds water and lets it soak into the joints.

What are end dams and why do they matter?

End dams are the upturned ends of the flashing under a sill, bent up at least an inch. They stop water from running off the sides of the flashing and into the wall. Without them, the flashing sends water into the brick instead of out of it.

Can a sill leak even if the brick looks fine?

Yes. The parts that fail, the flashing and end dams, are hidden inside the wall. A sill can look perfect from outside while water runs in behind it. The damage shows up later as an inside stain or flaking brick under the sill.

How often should the sealant around a window be checked?

Sealant has a limited life and cracks as it ages, so check it every few years and after hard weather. Cracked or missing sealant lets water slip behind the sill. Resealing early is cheap next to repairing a wet wall.

Posted in Brick Mason | Tagged brick mason, brick masonry, brick masonry problems, masonry contractor

Post navigation

← Older posts

© Copyright Madison Brick & Stone
Madison, Alabama ​35758
Phone: (256) 270-2702

Privacy Policy | Terms of Use

Web Development and SEO by: AuburnBusiness.com

The owner of this website, AuburnBusiness, LLC, provides marketing for local skilled labor businesses in the Huntsville and Madison, AL area.

↑